Thursday, December 12, 2013

Most Common HTML5 Interview Questions to Answer in Interview!


As you Already know that HTML5 is the New Standard of HTML. The major reason to design HTML5 is to deliver almost all the things online with including any plug-in. It does everything in browsers like Music, Movies, Animations, and Apps it also can used to build most of all applications which runs in your browsers.
 
If you want to know more about HTML5, continue learning at: http://www.w3schools.com/html/html5_intro.asp

Here are few of the Most Commons Interview Questions which need to go through once!

What is the Difference between HTML and HTML5?
There are many differences; HTML5 upgraded with great application development platform, whereas HTML was a simple language platform arranged with images and text on a webpage. HTML5 Included a better support for Video, Audio and Interactive Graphics, it carries a new elements, has more robust exchange protocols and also supports offline data storage for applications. Browsers can process with elements without any additional plug-ins like Adobe Flash, Sun Java FX etc.

What are some of the new HTML5 markup elements?
There are many Markup Elements included: few of them are; <article>, <aside>, <audio>, <command>, <details>, <figure>, <summary>, <header>, <footer>, <hgroup>, <mark>, <meter>, <nav>, <progress>, <ruby>, <rt>, <section>, <time>,<video> etc.

What are new HTML 5 DocType and Charset?
HTML 5 DocType has been simplified as: <!doctype html>
And HTML 5 uses UTF-8 encoding as: <meta charset=”UTF-8”>

What are the Elements which have disappeared in HTML5?
The Element <frame> and <frameset> have been removed. Some of the other elements which are no longer supported include: <applet>, <noframe>, <basefront> and <bigcenter>.\

What are the Media Related elements in HTML5?
HTML5 has a strong support for Media. The Tags like <audio>, <video> and the Special. There are few more A/V (Audio / Video) support media related tags which are like <source> which is useful for A/V media from Multiple sources, <track> tag is for adding test tracks to media and <embed> tag is a container for third party applications.

How can we embed Audio in HTML 5?
Audio formats like mp3, Wav and Ogg, can be embedding in HTML5. The standard audio Code in HTML5 as follow:
<audio controls>
<source src="webelessons.mp3" type="audio/mpeg">
Your browser will not support audio embedding feature.
</audio>

How can we embed Video in HTML 5?
Video formats like MP4, WebM and Ogg, can be embedding in HTML5. The standard Video Code in HTML5 as follow:
<video width="450" height="340" controls>
<source src="webelessons.mp4" type="video/mp4">
Your browser will not support video embedding feature.
</video>

Wednesday, December 11, 2013

3 Reasons - Why you need to Have Personal Website?

May be you are a Professional Job Holder or a Business man or even a student, having a personal website will keep you into an invaluable communication environment. You can explore yourself tremendously to the internet world. So, never miss a chance to start and have a personal website right now.


Here are the at least 3 reasons why it is highly advisable for you to have a Personal Website to be in Present Online 24/7.

1. A Personal Website Lets Your Personality Shine. 
Having a Personal Website is always represents your presence in the Online World. Whether you share a hobby, any experience or life philosophy or sharing any images, videos etc., will somehow connect with your audience and reminds them that you are a Real Personality. Even a personal website may shine yourself and make you popular. Most the popular individuals from Hollywood stars, sportsman’s, and business man’s are maintaining personal websites and sharing their feelings.

2. It will Spreads your Voice & Words across the World.
The Personal website gives you a chance to talk about your experiences, interests and even you can share your professional knowledge which spreads across the world and it helps who needed. Spreading your voice or words through website is a great way to explore yourself to the world and become popular.

3. It makes you a Member of the Largest Community of the Online World.
Just like a having computers and mobiles phones, a personal website is a must-have personal trait nowadays. The Fast growing technologies have changed the world tremendously and making the people to have a website from a whim into a modern necessity. As of today, using email is become very common and just in few more days, having personal website becomes very common factor as now many people are expected to be having their own personal website space in the Internet world.

So, what are you waiting for, I hope you don’t want to delay anymore to have a personal professional website now. You can have a Professional Personal Website for Free at Cost at Click here to have a Stunning Website for Free.

Thursday, November 28, 2013

11 Mistakes That Violates Google AdSense TOS And Gets Account Terminated

In the Internet world everything looks like easy and achievable, but the fact is nothing is easy. If you really want to make out some money from internet, you need to work hard and there are no other choices. Yes, I agree there are few shortcuts which will give you little success but after some time you have to face failure with disappointment.
Whenever I focus on the Internet opportunities to makeout some money, the first thing come to my mind is Google Adsense.

As you already know that, Google Adsense is a largest & more efficient source of online income. But equally large number of successful publishers gets banned for minor mistakes.

Just follow these 11 advises to prevent your Google Adsense account from getting banned.

1. Never Click Your Own Ads
Never click on your own adsense ads even for mistake, or for any purpose. Never tell your Friends, Office or Family members to click on ads as this surely shut your Adsense Account. Instead tell your loved once to avoid clicking the ads as it may get banned the account. Never try to use programmed clickings with any other software’s for auto clicks as Google Adsense team can recognize it. Now-a-days Adsense become very intelligent to recognize Fake Clicks

2. Never Modify Given Adsense Code
At any cause never modify given Adsense Code. If you want to customize the look and feel for the ads, Adsense itself provide you the customization tools where you can change the color, backgrounds, size to match your needs. Whatever changes you need just do it in there toolbar and get the code, once you get the code never try to re-write or modify the code as it may create a problem for your Adsense Account.

3. Never Put More Than 3 Ad Links Per Page
Never put more than three ad items or three ad links or 2 Adsense search boxes on any individual web page. Even by mistake if you place more than 3 ads in any page, the 4th ad will not show up in those units. But be little conscious while placing ads in Webpage, as this is the restriction they set, so it is better to stick to it.

4. Never Use Other Then These 2 Titles
As per the Guidelines of Adsense you cannot use your own Title for Adsense Ads. These two titles as “sponsored links” or “advertisements” only can be use. Surely the other labels are not permitted. There are so many websites who never follow these rule, may be the lack of awareness or negligence, but surely there Adsense account will be in danger.

5. Never Target A New Tab For Clicked Ads
As per the Adsense Rule the ads should open on the same web page but not in any other new pages. Surely, never try to target new page for your clicked ads as they will penalize your Account.

6. Never Maintain Multiple Accounts
One Adsense Account can serve you for Several Web Sites. You do not need to have multiple Accounts for your Multiple Websites. Just 1 Adsense Account is enough to Maintain Multiple Websites. Lot of people believe that Opening Multiple Accounts will be safe side as if one Account is closed down then another Account will save him, but the fact is that Adsense is too Intelligent as when they come across to those then all your accounts will be banned. Remember, only 1 Account is permitted for 1 Individual Person.

7. Never Put Adsense Code In Parking Web Pages & Pop-ups
Never forget to put ads only on material content pages. Remember advertisers will pay only for content based ads. As per Google Algorithm! Content drive appropriate ads Automatically. Even though the fact that you might get some clicks from login, signing up, mistake, welcome web pages or Thank you Pages, pop ups or parking web pages, it will surely will be banned from the program. So, place the ads only on material content pages.

8. Never Promote Ad By Email
Remember that delivering your ads through e-mail is strictly prohibited. Never deliver your ads by e-mail. HTML Version of e-mails appears well and supports the code but as per Terms of service it is not permitted. It is far better to be far with this type of techniques to get Clicks.

9. Never Avoid To Track Content
Content Material for any webpage plays a key role to generate good Income through Ads. Never miss out to keep track of your Content Material Regularly. Just, track your content as it should not violate the terms of Adsense. Surely avoid any pornographic, aggressive, unlawful content or hate-related.

10. Never Advertise Too Much
You need to avoid too much of advertising and keyword & key phrase stuffing. The Targeted content and high traffic flow will get you much more revenues. Never write any article or content to target Search Engines by placing Keyword cramming, yes it always better concentrated ads, but overdoing is not recommended.

11. Never Use Unsupported Languages
It is Very Important to make sure that your language is supported – Check once Adsense sustains “Chinese (simplified), Japanese, Korean, Norwegian, English, Polish, Danish, Finnish, Portuguese, French, Dutch, Russian, German, Spanish, Italian, Hungarian, Swedish and Turkish”. In addition, AdSense for research is readily available in Conventional Chinese, Czech, and Slovak. If your website or webpage language is not backed in the above list, do not use the Adsense code on those kinds of webpages.

These are the major mistakes to be avoided with Adsense, I strongly recommend you to take some time to read Terms & Conditions of Adsense Account before Using the Program.

How to Add Template in Blogger? 4 Simple Steps!

Here in this article I like to provide a step-by-step guide on how to apply a new .XML Template to your blog. The process of adding template to a blog is easy but little careful is needed to complete the task. Just follow the step by step instructions below.
To add any Template you need to get ready with .xml template which you have to upload to blogger.
If you don’t have a template and want to get it for free. Visit http://btemplates.com where you can find 1000’s of free blogger templates to download.

Step 1:
Sign in to you Blogger Account and choose your blog which you want to change Template.

In the left given menu List, choose the Template category.

Step 2:
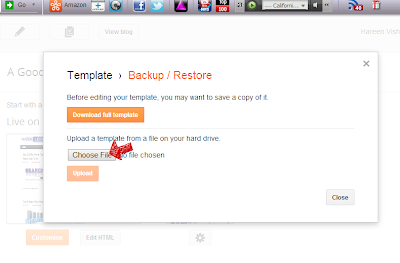
Now you will see the two screens "Live on Blog" & "Mobile". Right side Top you will find Restore / Backup Button, click it.


Step 3:
After clicking "Restore / Backup" Button, you will get popup where you need to upload the .XML file. Click Choose File and select you favorite .Xml Template file and click Upload button which you will find below Choose file.

Note: Depending on your internet speed, you need to wait 1 to 2 minutes to upload your xml file.


Step 4:
After uploading the file. you will see the new template preview in both Live on Blog and Mobile as same a below: Click View Blog in the Top to View your New Template Blog in Live.


Friday, November 22, 2013

Get 200% More Traffic From Search Engines With Simple SEO Keywords Trick

Basically Every Blog or Web Content writer will use Keyword Analyzer Tool to check the density of the keywords for the Article while posting. The Density of the keyword means that how frequently the highlighted keywords has been used in the Article.

Basically the poor density of the keyword in any Article will stay with the Poor Result in the Search Engines. So, whenever you are writing any Article, Choose the keywords which you want to optimize and then maintain good density for that Keyword while writing the article.
In some situation there will be a Multiple Keywords which lead to the same Meaning of sentence. For Example we use USA or America, these two words are different but the meaning will be same:

Most of the people will search with the different keywords to get same Information. For Example:

1st Example:  What are the USA Stock Exchange Trading Timings

2nd Example: What are the America Stock Exchange Trading Timings

So, if you choose the 1st Example keywords to write Article then you may lose the Search Results of 2nd Example Keywords.

The same way if you choose the 2nd Example keywords, then you will lose the Search Results of 1st Example Keywords.

So, you need to manage the Both Keywords, something like: “What are the USA ( America ) Stock Exchange Trading Timings”


If you can manage to write this way, then you can grab the both Keywords in the Search Results. In the both above case your Blog Post will be shown in the SERP ( Search Engine Results Page ). Your Website traffic will boost very much with 200% improvement.


Never Miss to Include Alternate Words:

While writing any Article, never miss the Alternate Words wherever possible. Try to explain in detail with alternate words in Bracket, which will surely boost your Search Engine Results Page ( SERP ) and also people will understand your writing more clearly.

Write the article for the people, but not for the Search Engines because people are more important than Search Engines. While writing any article try to repeat the Keywords wherever possible but the meaning of the sentence should not change. Personally I won’t recommend the Keyword Density Checking Tool to check the Keyword Density.

So, I Hope you got it what I want to say in this article. Please do positive comments... so that it will really Boost me to write some more Articles. Thanks for Reading and ALL THE BEST.

Wednesday, November 20, 2013

Top 6 Best Web Hosting Companies In The World

As you already know that choosing the best Hosting Provider is very important for any Website Owner. Here in this article I like to share my Top Most 6 Best Web Hosting Providers in the world and I am sure that these providers are very genuine and can serve your great.


Please go through all these Top 6 Hosting Providers Websites and know how they can serve you. As per my view I will arrange these top 6 hosting site details with Ranks as per there service these Month and I will be doing regular monthly update in the rank positions.

Top 6 Best Hosting Service Providers!

1st Rank # Blue HOST

Over 20,000 (Approx) NEW Customers add there service Every Month & Presently Hosting Millions of Domain!

Blue Hosting is providing and Professional Hosting Service with Just $4.95 / Monthly. There are NO Hidden Charge Fees and also they are providing Free Instant Set-up. The Amazing thing Is that Blue HOST is providing the “Anytime Money-Back Guarantee” where you can take back your money in case of Dissatisfaction.


2nd Rank # HostGator

Over 9 Millions Domains are under this Hosting Service Provider. The Unlimited Web Hosting Service with just $3.96 / Monthly. No Hidden Charges. Also provides 45 Day Money Back Guarantee, which is surely Easy and Affordable.


3rd Rank # HostMonster

No doubt Host Monster is a Great Service Provider with Good Customer care Support all time. An Award Winning 24 x 7 Support. More than 1 Million Trusted Websites are under this Hosting Service Provider.


4th Rank # Domain

Domain.com not only provides a domain name service but also they provide good Hosting Service in minimal cost. It is providing Cool Hosting Plans with Simple Site Builder with Custom Web Design to make it more simplify. Try it once.


5th Rank # BrainHost

Comparatively it is little costly service but it has a great cPanel Control Panel, Free Easy Website Builder. The great part of this Hosting Service Provider is 1-click Scripts Install.


6th Rank # GoDaddy

As we already know GoDaddy is a No.1 Domain Sell Website in the Internet World. Godaddy carries a good Hosting Service which is growing strong and strong day to day. It is providing an easy way to own a professional Website with the Website Builder.


Thanks for spending some time with WebeLessons, I tried my level best to share some of the Best Hosting Service Providers. As per the Article written date, I found the above Website Hosting Providers are best. Please do the Positive Comment as it will be good to have a feedback for the article.

Please Follow our Facebook Page which will be really helps us to continue the Work and update with valuable content articles.

Monday, November 18, 2013

Top 7 Steps You Need To Take For Your New Website Blog

In my previous article you have already saw Ask Yourself 3 Questions Before Plan to Make Money Online. And now in this article I like to share the Top most 7 steps which need to take for you to start for New Website Blog. Before that remember that self motivation is very important to run any website blog, your need to stick with the clear goal and stay with consistency to achieve with successful blog. If you are already running a blog or just started with the New Blog Website, you need to consider these 7 Steps to implement for all success.


Step 1# Find & Get a Perfect matching Domain
After choosing your Category Niche, Find a Perfect Domain which should clearly linked with your Category Keywords. Make sure that the domain should be SEO (Search Engine Optimization) friendly so that it will optimize in Search Engines. You can use Google’s Keyword Tool to find the better and perfect keywords which matches your Category.

Step 2# Choose a Good Looking Template
Here you should remember that, choosing a good Looking Template always helps to increase the Traffic Visitors and helps to stick with the website. The Design and Layout plays the major role for any visitors to stick for more time and spend with your blog. So, choosing the attractive template which suits your category is very important task which should be done very firstly.

Step 3# Need Attention at About Us Page
Basically, most of the people won’t consider About Us Page as Important, but it is very important as it helps the visitors to keep trust in your Website. People always like to know about the author and if you are ready to put information about yourself then it helps us to make a good relationship with readers.

Remember, blog success will always depends on the useful contain which you share in your blog and always keep attention to share about your self as maximum as you can at About Us Page.

Step 4# Should Take Social Media Support
Linking Social Media buttons will definitely boost your blog and helps you to connect with your web blog followers. So, make sure that you have a successful Social media Icons like Facebook, Twitter, Google+ etc Buttons in your Blog.

Step 5# Call to Action for POST
It means making a readers to share the Post in there social media network. The call to actions is extremely important in increasing the users for your blog. Now a days it is very important to add a sharing post widget for great successful of website blog, So, Add call to action widget plug-in to your Posts.

Step 6# Schedule the Posting Time
For every successful Website Blog, consistent Article postings are very important. Regular Posting has to be done, should schedule the Posting time as per your Analytics report. Consider the maximum visitors flow time in a day and try to post the article at that particular hour to increase the readers. And also its helps to achieve the good results are google and alexa rankings.

Step 7# Facebook Popup LIKE Box
Basically many people won’t consider the facebook popup Like Box to integrate in there website blog, as it gives the negative impression but I strongly say it helps a lot as if you have a strong command on your writings and have confidence on your content then to go for Facebook Popup Like box as it will increase the followers tremendously.

You can see the good result with Popup box then the sidebar or footer widgets.

Thank you for spending some time and reading my article. If my article really helps you than please do positive comment as it really helps.